
Python for CI/CD
By Maaz | February 14, 2022 | Python |
.
Avoiding integration hell is a must-do but seemingly simple task when your organization starts growing and hiring new developers. When working alone, writing code on your own and making it work might seem enough. However, working with a team of professional software developers adds the challenge of coordinating many people working on the same code. Unless you want to spend hours, or even days, fixing the code so that it can finally integrate, making sure everyone is in sync, and guaranteeing nothing is broken, you should use Python for CI/CD.
According to RedHat, “CI/CD is a method to frequently deliver apps to customers by introducing automation into the stages of app development. The main concepts attributed to Python for CI/CD are continuous integration, continuous delivery, and continuous deployment.”
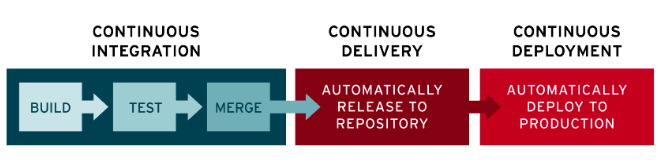
Now that we know what we’re talking about, let’s see how it all works.
How to build a CI/CD pipeline with Python
![]()
We will be building a small CI/CD pipeline in 7 steps as you’ll see below. Let’s get started!
-
WRITE A PYTHON PROGRAM
First, we need a small software that will be deployed to the cloud. We will build a movie name generator, but it could also be a movie recommendation system
To do this, first create a new directory (let’s call it “python-cicd”).
Inside this directory, create another directory called “generator” and, in this directory, save two files:
- An empty file called “init.py”
- And this script file called “generator.py”
Link: script You should be able to run this Python script from the command line inside the “generator” directory we mentioned above; try it and check the movie results.
Looks good! Now go ahead and add your own words to make more original movie titles.
-
AUTOMATE TESTING
Many programmers choose to test the code they are writing manually by calling the piece of code they are developing, then printing the result to the console and, finally, visually scanning the output for correctness. This works for simple tasks but poses some problems:
• When the output becomes too large, it gets harder to spot errors.
• When the programmer gets tired, it is easy to miss subtly incorrect output.
• When the implemented feature becomes larger, we tend to miss bugs we might have introduced in parts that were “tested” earlier.
• Because the informal test scripts tend to be only useful for the programmer who wrote them, this means it is of no use to other developers.
These issues are the reason unit testing was invented. Through unit testing, you write sample calls to pieces of code and compare the return value to the expected value.
This comparison is generally done in a way that gives little or no output when the test passes and very obvious output otherwise. You can use a test harness to run tests from several test scripts and report just the errors and a statistical summary of the passed tests.
We need some additional tools to run the unit tests we are going to write. These are available as Python for CI/CD packages. To install them, you should use a tool called virtualenv.
python-cicd$  virtualenv venv
Honor With Men'S Legacy
Honor With Men'S Legacy
python-cicd$ source venv/bin/activate
(venv) python-cicd$
Next, create a new file called “requirements.txt” that lists the pytest dependency:
pytest==6.2.4
To download the dependencies listed in the requirements file, you’ll need to execute the “pip” command:
(venv) python-cicd$ pip install -r requirements.txt
Create a new folder called “test” and put two files inside:
An empty file called “init.py”__Italic And this script file called “test_generator.py”
Link: script
Then, run the test file.
(venv) python-cicd$ python -m pytest -v test/test_generator.py
You should see them passing.

-
PUSH YOUR CODE TO GITHUB

We chose GitHub for this article, but you can use virtually any Git provider. Let’s start by logging into GitHub (you should get an account first if you don’t have one already) and then create a new public repository called “python-cicd”.
Inside your project directory, create a new file called “.gitignore” containing the following:
venv
__pycache__
test/__pycache__/
generator/__pycache__/
This will prevent Git from adding the virtualenv or any IDE file that can cause us problems later to our repo. Now you should initialize Git locally and push your code to GitHub:
[python-cicd] $ git init
[python-cicd] $ git add *
[python-cicd] $ git commit -m "Initial commit"
[python-cicd] $ git remote add origin
git@github.com:/python-cicd.git
[python-cicd] $ git push -u origin master
-
SETUP GITHUB ACTIONS CI TO CONTINUOUSLY RUN YOUR AUTOMATED TESTS

Go to your GitHub repository, and create the new workflow in the actions tab.
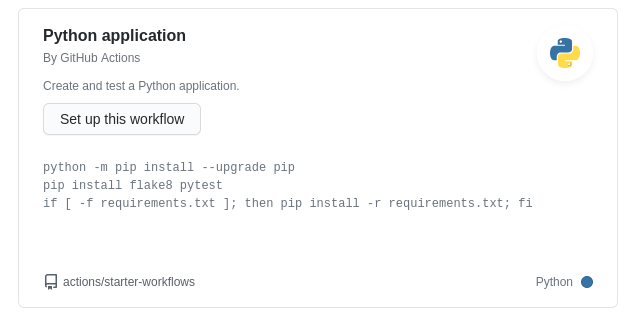
This should commit a YAML file into your repository. In the .github/workflows folder, your YAML file must be similar to this:
Link: script Remember to change the Python version to the one you are using in your project.
Then, try it out by making any changes to your code and pushing them; it should start a build process on the actions tabs that looks something like this:
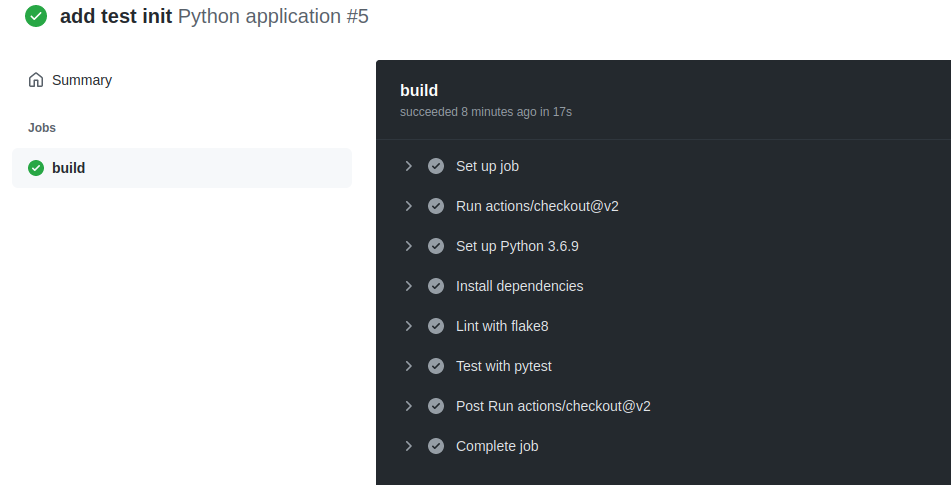
Congratulations! You have successfully built your very first continuous integration pipeline
-
SETUP WILY TO CONTINUOUSLY CHECK YOUR CODE QUALITY
Wily is a python tool that helps you keep track of the maintainability of your project, in order to write simpler and more maintainable Code.
In each build, we will show the evolution of your maintainability score and other metrics such as lines of code or cyclomatic complexity.
First, we need to install Wily.
(venv)[python-cicd] $ pip install wily
Add Wily to your requirements.txt.
(venv)[python-cicd] $ pip freeze > requirements.txt
Then, we will add Wily to the GitHub actions pipeline by editing our YAML file. Add a new step to our pipeline file, called “Wily”, to the end of your file.
Link: script
Push your changes and check the GitHub actions execution; you should see something similar to this output:
-
TURN THE PYTHON PROGRAM INTO A WEB APP
Great work! We already have a CI pipeline that checks for functionality and quality.
Since we will deploy the software to Heroku as a web app, we first need to write a little Python Flask wrapper around our movie generator to make the program respond to HTTP requests and output HTML.
Add the code below in a file called “app.py” in the root of your project directory:
Link: script
Install Flask.
(venv)[python-cicd] $ pip install flask
Add Flask to your requirements.txt.
(venv)[python-cicd] $ pip freeze > requirements.txt
You can now run the Flask application locally.
(venv)[python-cicd] $ python app.py
* Serving Flask app 'app' (lazy loading)
* Serving Flask app 'app' (lazy loading)
* Serving Flask app 'app' (lazy loading)
* Environment: production
WARNING: This is a development server. Do not use it in a production deployment.
Use a production WSGI server instead.
* Debug mode: off
* Running on all addresses.
WARNING: This is a development server. Do not use it in a production deployment.
* Running on http://192.168.1.6:5000/ (Press CTRL+C to quit)
Open the local host location and you should see the app running smoothly.

Refresh it a few times, and check out the movie title ideas.
Push your changes and see Wily’s magic in action.
-
DEPLOY THE WEB APP TO HEROKU
 Heroku is a cloud platform used to host small and scalable web applications. It offers a free plan so go to https://signup.heroku.com and sign up if you haven’t already done so.
Once you are in Heroku, sync your GitHub repository to the Heroku CLI, so, whenever you push new changes to your code in GitHub, Heroku will build and deploy your app automatically.
Start by creating a new app in Heroku and, in the deployment method option, choose “connect to GitHub.”
 .
.
You may have to log into GitHub if you haven’t already, and select the repo for the project.

Heroku serves Python apps with Gunicorn “Green Unicorn”, which is a Python web server that is simply implemented, light on server resources, fairly fast, and broadly compatible with a number of web frameworks. First, we need to install it.
(venv)[python-cicd] $ pip install gunicorn
Add Gunicorn to your requirements.txt.
(venv)[python-cicd] $ pip freeze > requirements.txt
In the root folder of your project, create a “Procfile” and write the following code:
web: gunicorn wsgi:app
Then, create a “runtime.txt” file and include the Python version you are using; in our case, it’s version 3.6.14.
python-3.6.14
Create a “wsgi.py” file and insert the following code.
from app import app as application
app = application
if __name__ == "__main__":
app.run()

Commit your changes and push them to Heroku.
git push heroku master
If everything went well, you should see the movie generator rocking on the cloud!

Congrats! Now, with every change to your code, you will automatically run tests, check maintainability and deploy to Heroku! If you are facing any issues during deployment using Python for CI/CD, feel free to contact us, or check Heroku’s official Python [page](https://devcenter.heroku.com/categories/python-support).
RELATED POSTS

Python
Python for CI/CD
Avoiding integration hell is a must-do but seemingly simple task when your organization starts growing…

Resources
Meet Figma and its incredible San Francisco headquarters
We are not shy when it comes to our love for San Francisco and definitely

React Native
React Native Live Stream Video
Streaming is something that we see every day at all times in applications such as